Creating a campaign
To create a campaign, navigate to “Campaigns” in the sidenav, and click “Create campaign” in the top right.
- Name: Name of your campaign
- Description (optional): Description of your campaign.
- Labels (optional): Add labels or tags.
- Mode: Select mode from Voice, SMS, Email.
- Channel source: Select a channel source, which is assigned to an outbound agent, that will be doing the outreach
- Display ID: Enter the phone number or caller ID that your recipients will see
- Rate per hour: Set the rate of outreach per hour (e.g., If set to 60, it will try to do 1 outreach per minute)
- Campaign hours: Set the days and hours of operation for your campaign. You can set it so that it will only run during weekdays, or normal business hours of 9 to 5.
Call filtering
Voice and SMS campaigns can be restricted to reach only certain phone numbers based on what a carrier lookup reveals about each number—for example, dialing landlines and internet-based numbers but never mobile phones, or including a specific carrier that would otherwise be excluded. This is useful when an outreach effort only makes sense for a particular kind of destination, or when you need to stay within calling guidelines that depend on the type of line. The Call filtering controls appear in the Campaign create and edit form (below the voicemail detection settings). You build the filter from one or more rules, and choose how those rules combine. When a filter is active, Syllable looks up each number as it is added to a batch and only contacts numbers the rules allow. Numbers that don’t match are never dialed or messaged: they land with a request status of SKIPPED and a channel status of FILTERED_LINE_TYPE in the batch results. You can subscribe toFILTERED_LINE_TYPE as a webhook trigger if you want to be notified when numbers are filtered out.
The attributes you filter on come from Twilio’s Line Type Intelligence lookup.
To configure the filter:
- Set A number is dialable when it matches to choose how rules combine:
- all rules: a number must match every rule to be dialed (AND).
- any rule: a number is dialed if it matches at least one rule (OR).
- Set Numbers we couldn’t look up to decide what happens to numbers whose lookup returns no data—Dial them or Skip them.
- Click Add rule and configure each rule with three parts:
- Attribute: the number property to test:
- Line type: Mobile, Landline, VoIP (fixed), or VoIP (non-fixed).
- Carrier name: The carrier’s name (for example, a specific mobile or VoIP provider).
- Mobile country code (MCC) and Mobile network code (MNC): Numeric codes that together identify the carrier’s network—a more precise, stable alternative to matching on the carrier name.
- Condition: how to compare—is one of, is not one of, equals, or does not equal. (For Line type, only is one of / is not one of are offered, since you pick line types from a list.)
- Value: for Line type, choose one or more from the dropdown; for the other attributes, type one or more values.
- Attribute: the number property to test:
- Remove a rule with the trash icon next to it. To turn filtering off entirely, remove all rules (every number is then contacted, and no lookups are performed).
Example
To dial landlines and internet-based numbers but never mobile phones—while still allowing one specific carrier that would otherwise be classified as mobile—set A number is dialable when it matches to any rule and add two rules:- Line type is one of Landline, VoIP (fixed), VoIP (non-fixed)
- Carrier name is one of the carrier you want to allow
When a filter is active, each number added to a batch is looked up, and these lookups are billed as a per-number usage fee, priced at Twilio’s Line Type Intelligence lookup cost. Campaigns with no rules are not charged for lookups.
Batches
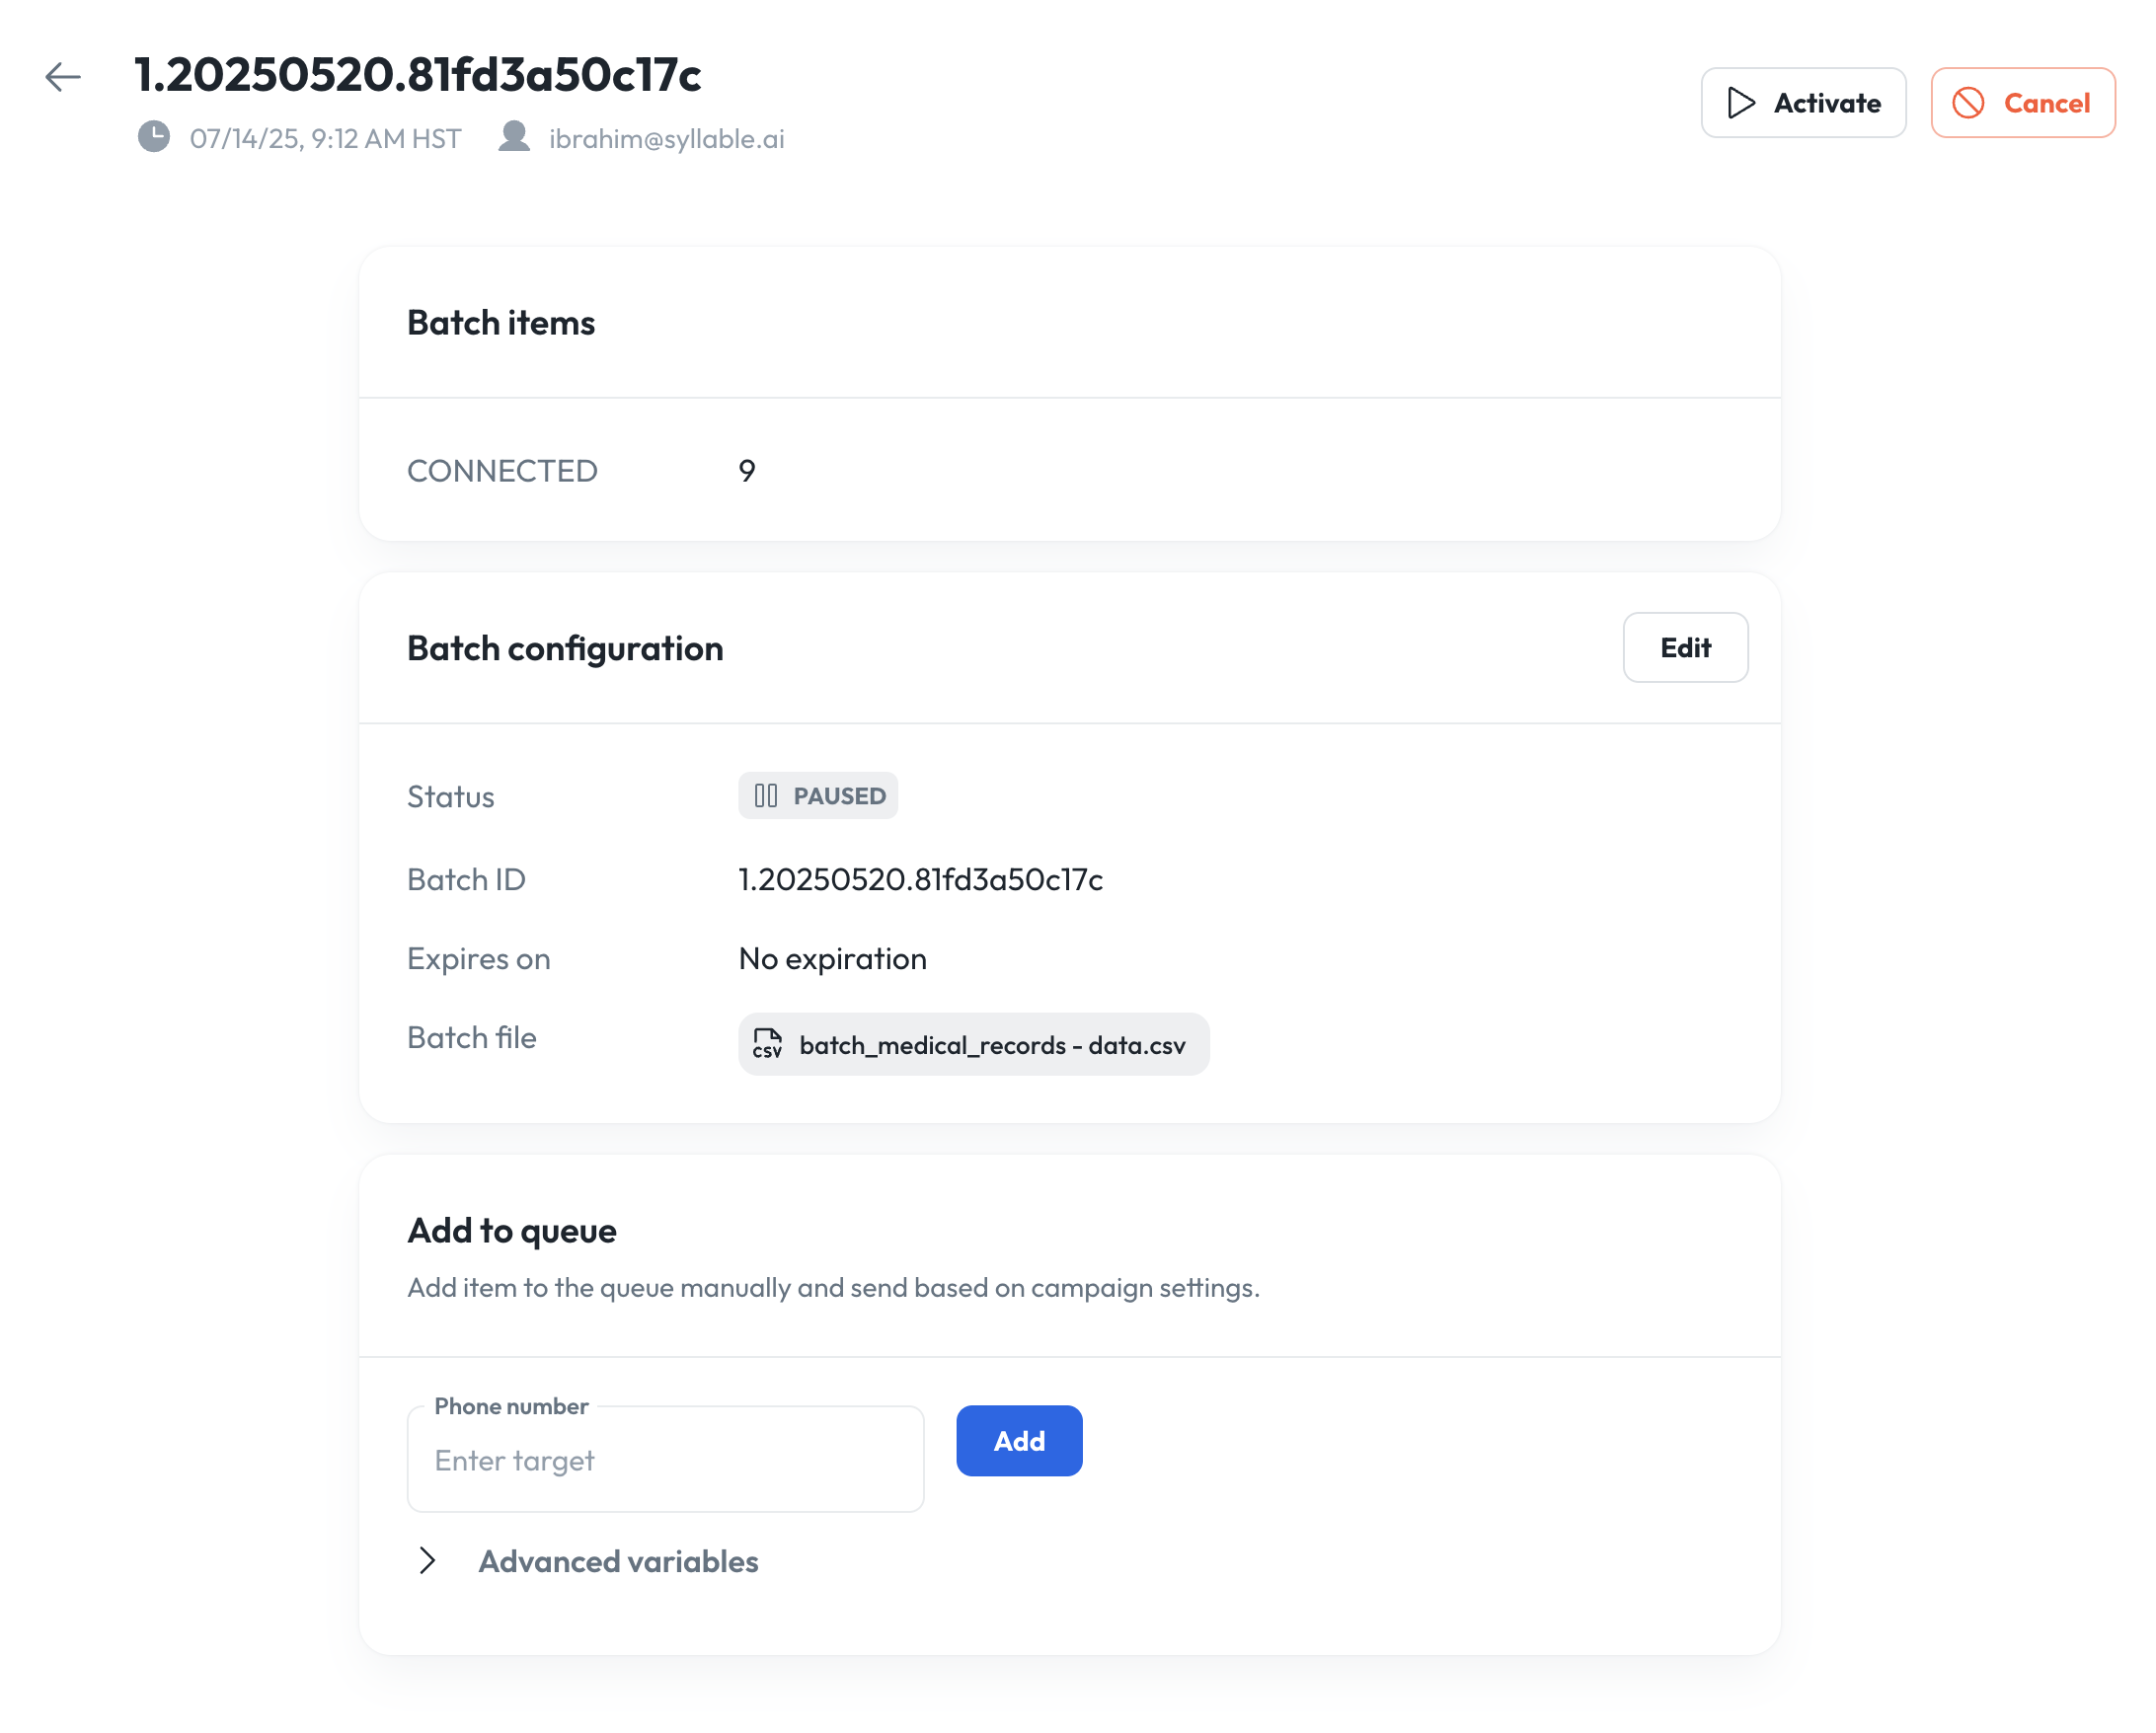
A batch is a grouping of phone numbers to call. Phone numbers to call are populated in a batch by uploading a CSV or manually adding a phone number. A campaign can have multiple batches, but a batch can only have one file upload.Creating a batch
To create a batch, click on a campaign, click the “Batches” tab and “Create batch” when you are viewing a campaign.
- Expires on (optional): Can set an expiration date for the campaign to end. This may or may not occur after all the contacts are reached out to.
- Note: Phone numbers in the batch will not be called after the expiry time
- Auto-run batch: This toggle is to immediately start running the campaign on the batch.
- If enabled, the campaign will automatically start reaching out to the contact list when you click “Save”. And new phone numbers added to the batch will be automatically called.
- If disabled, the campaign will be paused when you click “Save”, and you will need to click “Start” to have it begin reaching out.
Uploading a batch
You can create a batch in a few ways:- Directly through the API endpoint
- Upload a CSV file in the UI
- reference_id: A unique identifier
- target: Phone number in format +14155551234
- Any other columns can be referenced in the agent prompt or message. For example, if the CSV has a column “first-name”, the agent message can be configured to say something like “Hello vars.first-name” when that phone number is called. These additional columns are also accessible by the prompt. Reference Variables for more details.

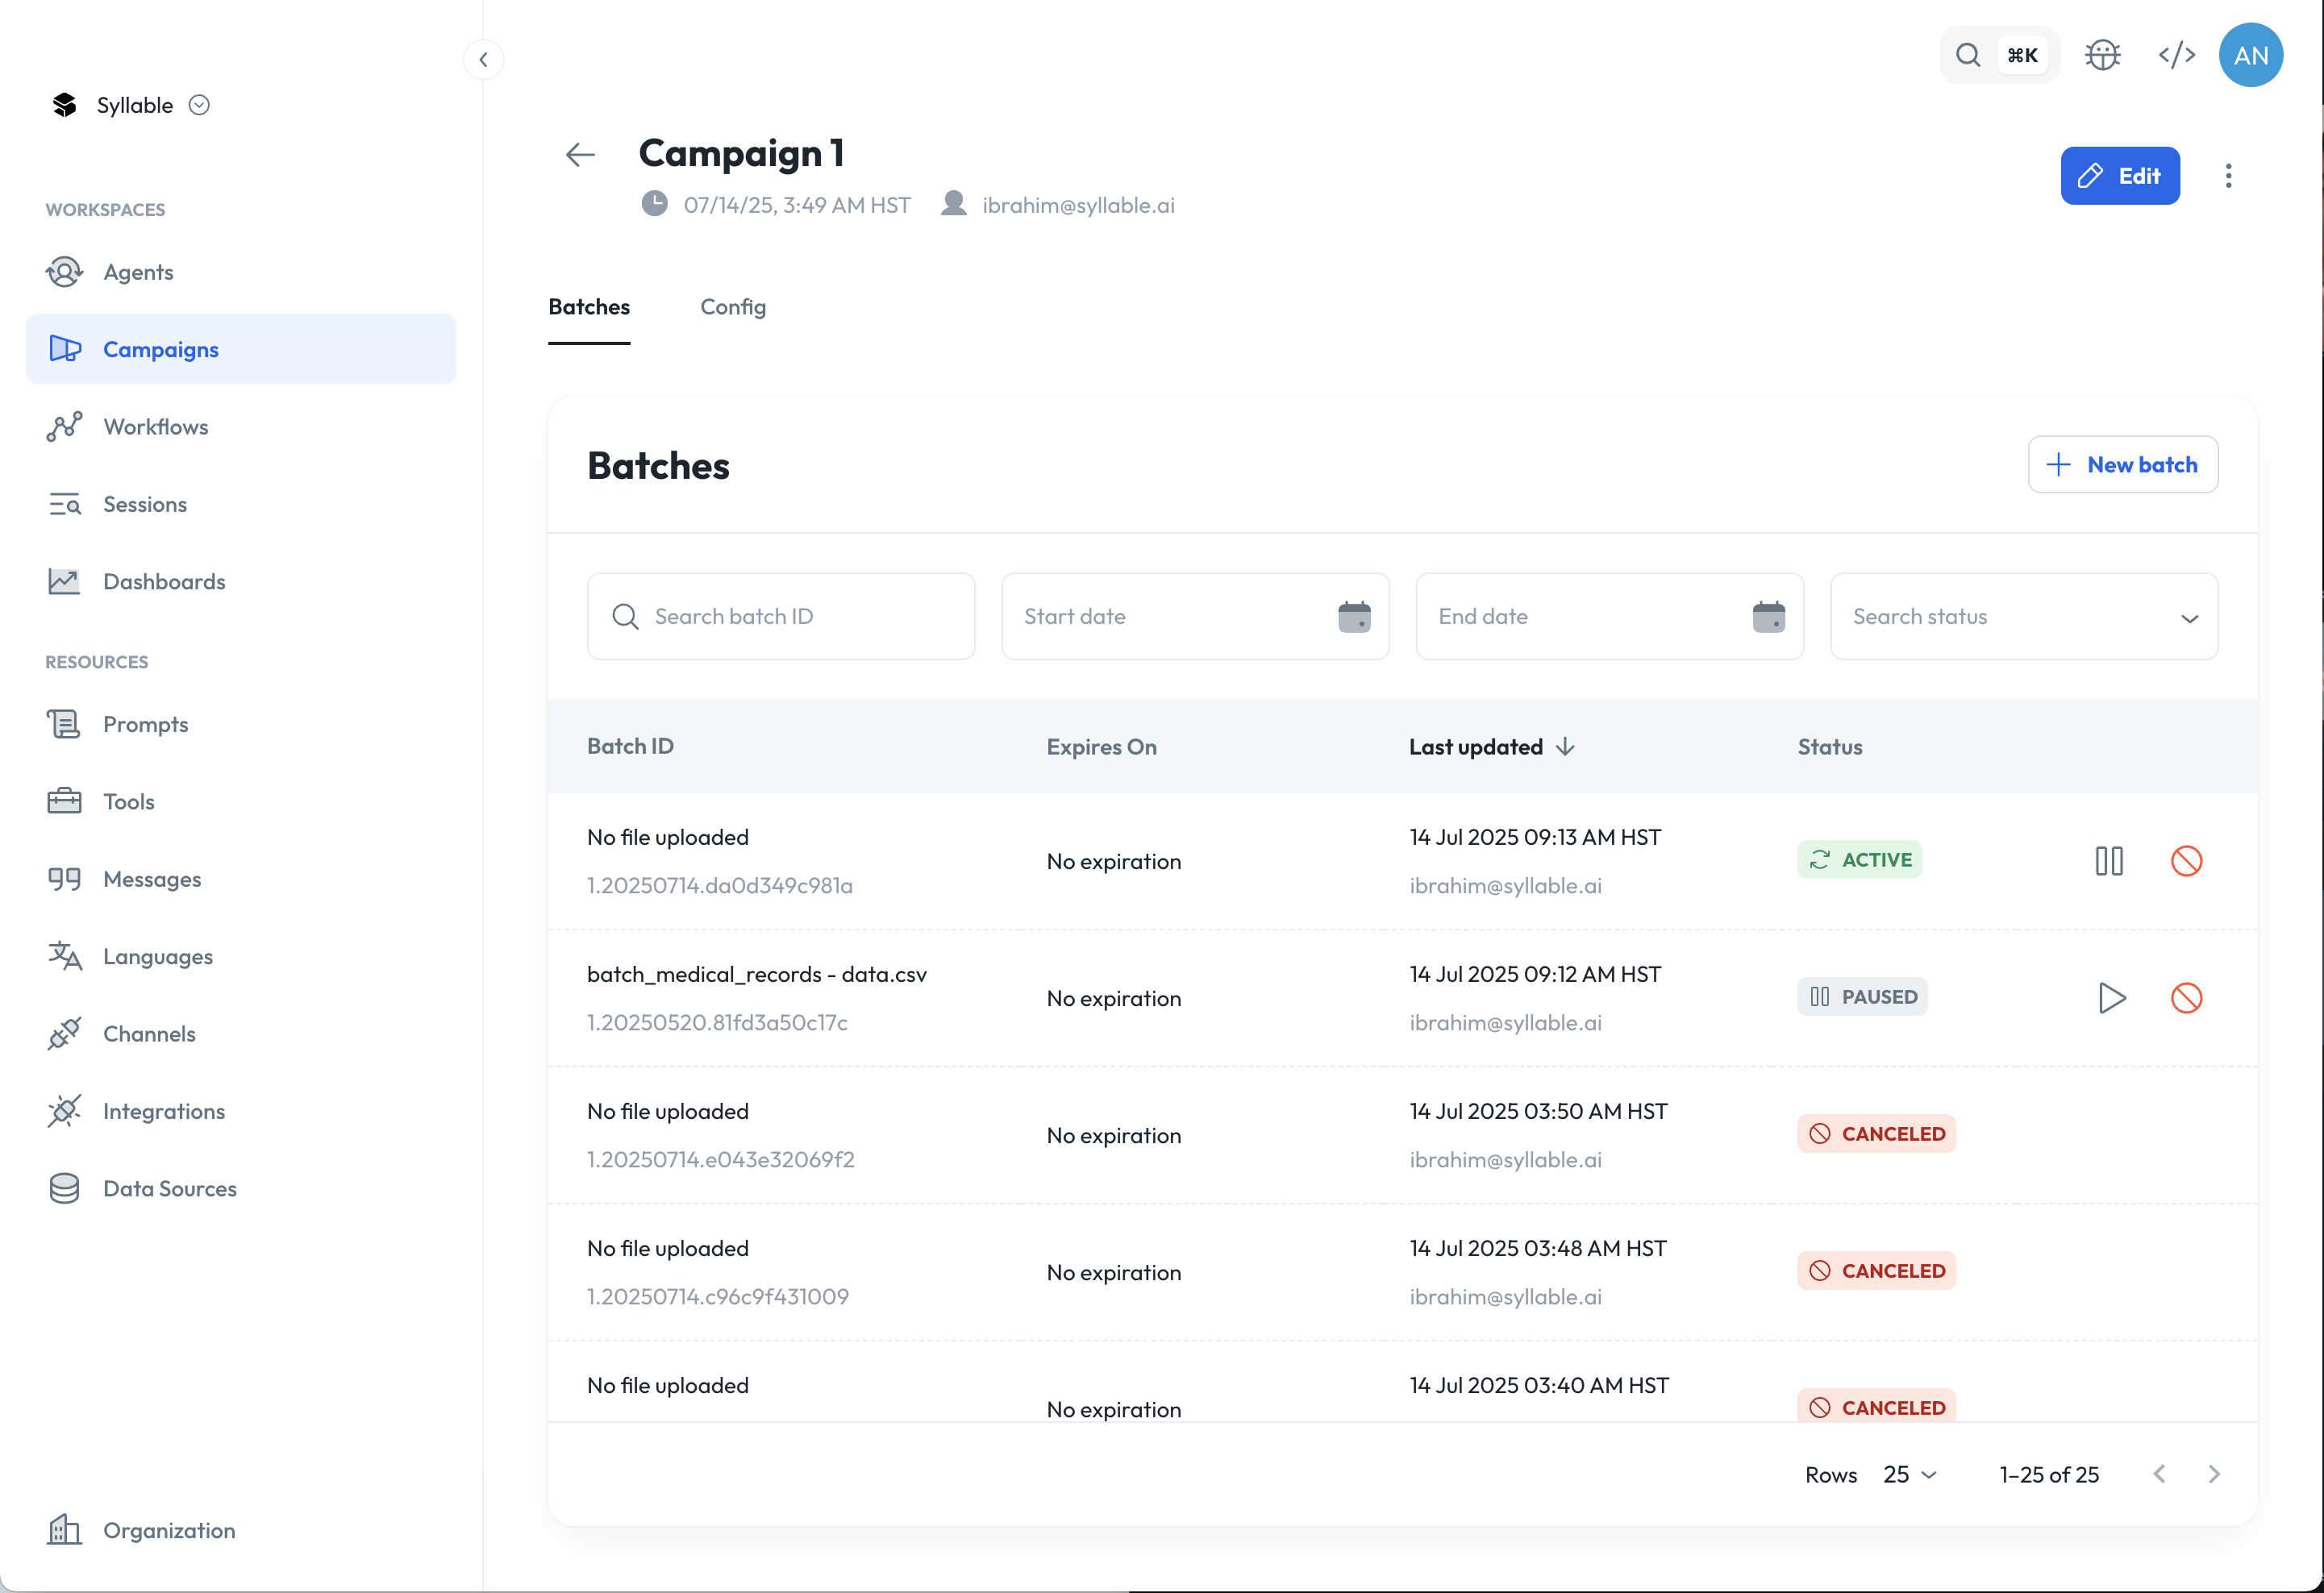
- Active: When batch upload is successful and campaign is running (e.g., Auto-run is enabled)
- Paused: When batch upload is successful and campaign is paused (e.g., Auto-run is disabled)
- Pending: When batch is created, but there is no file uploaded yet or is being processed
- Failed: When batch upload is unsuccessful
- Canceled: When batch is canceled
- Expired: When batch is expired
Testing your campaign
To test your campaign configuration and batch file upload, you can try sending one test call to see if it follows the specified business hours and rate of outreach.- Go to a campaign, click on Batches tab
- Click on a batch and add a test number to the “Add to queue” section
- By clicking “Add”, it will be added to the batch, and will follow the campaign settings for business hours and rate of outreach.
- Note: Depending on your campaign settings, you may need to wait until the next scheduled outreach.
Campaign statuses
When running outbound campaigns, each request (voice call, SMS message, or email) moves through multiple statuses.Voice
SMS
Voicemail detection
Voicemail detection lets an outbound campaign tell whether a call was answered by a live person or a voicemail system, so the agent can respond appropriately — leaving a message on voicemail, or starting a live conversation with a person. In the Campaign create and edit form, the Voicemail detection setting is a dropdown with three options:- Disabled — no voicemail detection. The agent opens every call the same way, based on its prompt.
- Voicemail Detection v1 — the standard detection described below.
- Voicemail Detection v2 (beta) — an improved detection flow for trickier answering scenarios. See Voicemail Detection v2 (beta).
Voicemail Detection v1
When a call connects, Syllable determines whether the answer is from a live person or a voicemail system. If a voicemail is detected, the agent leaves a pre-recorded message for the recipient. If no voicemail is detected, the agent or workflow proceeds with a live interaction, based on the agent’s instructions. Configuration options With Voicemail Detection v1 selected, you can configure detection timeouts to control when and how voicemail is identified:- Pre-speech timeout: Time allowed before the callee begins speaking. If the user does not speak within this timeout, the conversation proceeds normally.
- Post-speech timeout: Time allowed after the callee finishes speaking. If the user stays silent for this duration, the system considers the speech ended and makes a decision.
- Overall timeout: Maximum total duration for voicemail detection to run before returning a result.
If you reach a voicemail set the voicemail_message to: “Hello, this is New Bay Health calling to assist you with scheduling your recent referral. We’re eager to assist you at your earliest convenience. Please give us a call back at 555-123-1234. Our scheduling team is available Monday through Friday from 7:00 AM to 5:00 PM to assist you. Thank you.”
Voicemail Detection v2 (beta)
Voicemail Detection v2 is in beta. It is available for outbound voice campaigns and is mutually exclusive with Voicemail Detection v1 — selecting v2 turns v1 off.
- A live person — the agent delivers your configured greeting and continues the conversation.
- A voicemail system — the agent leaves your voicemail message and ends the call.
- An automated call screener (for example, a system that asks for your name and reason for calling) — the agent answers the screener’s questions and works through the call the same way a person would: it can respond to keypad (touch-tone) menus by pressing the requested digits, and it can wait on hold when asked to hold. Once a human comes on the line, it greets the person and continues the conversation.
- A greeting must be configured on the campaign’s agent. Because the agent waits to identify a live person before speaking, it needs a greeting to deliver at that point. If the agent has no greeting configured, the campaign cannot be saved with Voicemail Detection v2 and you’ll see an error on save.
- Voicemail Detection v2 does not use the v1 detection timeouts, so those fields are hidden when v2 is selected.
- Open your campaign in the Campaigns workspace and click Edit (or create a new campaign).
- In the Voicemail detection dropdown, select Voicemail Detection v2 (beta).
- Make sure the campaign’s agent has a greeting configured.
- Click Save.
Webhooks
Webhooks give your systems real-time visibility into call progress. When an outbound call session changes status - for example, when a call connects, fails, or completes - Syllable sends an HTTP request to your registered webhook URL with details about the event. This allows you to programmatically track call outcomes, trigger alerting on failures, and update internal records without polling or waiting for a campaign to finish.Webhooks are configured at the campaign level. You can route different statuses to different endpoints - for example, send
FAILED events to an alerting service and COMPLETED events to a logging system.Configuring webhooks
Webhooks can be configured through the Console campaign configuration screen, the API, or the SDK. Each webhook requires:- Console
- SDK (Python)
- SDK (TypeScript)
- cURL
- Navigate to your outbound campaign in the Console.
- In the campaign configuration, find the Webhooks section.
- Click Add webhook.
- Enter your HTTPS URL (e.g.,
https://your-server.com/hooks/syllable). - Select the trigger statuses you want to receive (e.g.,
COMPLETED,FAILED). - Choose your authentication method and provide the required credentials.
- Save the campaign.
Webhook payload
When an outbound communication transitions to a status that matches one of your configured triggers, Syllable sends anHTTP POST request with Content-Type: application/json.
Webhook authentication
Webhook requests are authenticated using an HMAC signature to ensure they originate from Syllable. HMAC signature When you configure HMAC authentication, you provide a Base64-encoded shared secret (RFC 4648, decoding to 32–512 bytes of key material). Each webhook request will include two headers:
To verify a request:
- Extract the
X-Syllable-TimestampandX-Syllable-Signatureheaders. - Concatenate the timestamp, a literal
., and the raw request body:{timestamp}.{raw_body}. - Compute the HMAC-SHA256 of that string using your shared secret.
- Compare your computed signature to
X-Syllable-Signatureusing a constant-time comparison to prevent timing attacks. - Reject requests where the timestamp is older than 5 minutes to mitigate replay attacks.
Delivery and retries
Your webhook endpoint must respond with a2xx HTTP status code within 10 seconds to acknowledge receipt. The timeout covers the full HTTP response cycle. We recommend accepting the payload and processing it asynchronously if your handling logic may take longer.
If your endpoint returns a non-2xx status code or does not respond within the timeout, Syllable retries delivery:
- Up to 2 retry attempts (i.e., 3 total attempts) over approximately 15 minutes.
- If all attempts fail, the delivery is marked as failed.
event_time timestamp to determine the correct sequence of events. Because retries may cause duplicate deliveries, your endpoint should treat webhooks as at-least-once delivery. Use data.campaign_id + data.batch_id + data.recipient + data.channel_manager_status + event_time together as a deduplication key.
If you don’t receive events, check:
- Your endpoint is publicly reachable over HTTPS.
- The trigger statuses on the webhook match the call outcomes you’re testing.
- Your endpoint returns
200within 10 seconds. - Failed deliveries are visible in the Console under the campaign’s webhook status.